I have in my house 2 JUNK drawers. One is for pencils, tablets, paper clips, markers etc. The other drawer is for household items such as screw diver, pliers, batteries, Hooks, nails, keys etc. However they never stay organized, maybe that's why they are called JUNK drawers. I open them up and everything that doesn't have a place gets dumped into one drawer or the other, ya know all those little annoying things that just appear on the counter. I LOVED this idea.. I'm going out this minute and buy me a silverware holder like this one, hopefully I can find one. FINALLY a place to put all the sunglasses and phone chargers!
You will have significant experiences. I hope you will write them down and keep a record of them, that you will read them from time to time and refresh your memory of those meaningful and significant things. Some may be funny. Some may be significant only to you. Some of them may be sacred and quietly beautiful. Some may build one upon another until they represent a lifetime of special experience." Pres. Gordon B. Hinckley
Grandma's Covers
When you were small.....and just a touch away,
I covered you with blankets against the cool night air.
But now that you are tall.....and have moved far away,
I fold my hands and cover you with my goodnight prayer.
*Author Unknown
I covered you with blankets against the cool night air.
But now that you are tall.....and have moved far away,
I fold my hands and cover you with my goodnight prayer.
*Author Unknown
Jun 24, 2011
HOLD ON TO YOUR FORK
A woman who was nearing death, requested that she be buried with a fork in her hand. When asked why a fork, she went on to share that her favorite moment was when following a meal, she was reminded to ‘hold on to her fork’ which, of course, meant dessert was on its way.
She chose to be buried with a fork as a beautifully symbolic picture to those who would mourn her death that this world was not her home, but that the best was yet to come. Her view of eternity was so true … a place where even the best of this world would pale in comparison to what Heaven will offer.
I know it is easy to fear death or pain or hardship – especially when you just can’t seem to escape it – but please know that there is good to come for those who put their trust in God. Whatever your circumstance, whatever your current struggle, whatever your fear, know that not only is there hope of an eternal life with our Lord, but He also offers unexplainable peace, joy and comfort as we walk through trials here in this messy world.
Be encouraged and remember to hold on to your fork – the best is yet to come.
HAIR CLIPS
PROJECT FOR WHEN YOU HAVE NOTHING BETTER TO DO
Cut the ribbon into 7 inch LENGHTS
Ta Da
I found this cute idea for little girl hair clips. Since I have tons of ribbon sititng around and a grand daughter who loves clips I thought I would make some clippies for her. These illustrations are from JONES DESIGNS
It was eaiser than taking my own pictures and down loading them etc etc.
Start with some hair clips, thin ribbon, scissors and fabric glue.
I held the clip open backside-up and started the ribbon on the inside, wrapped it around the bottom, then wrapped the part of the clip where you squeeze, the top of the clip, and back inside to the middle. Whew! {Got that?}
Ta Da
Jun 12, 2011
HOW TO EAT AN ARTICHOKE
!


Cut all the points off of all the leaves with your kitchen shears
Place your artichokes in a pan with about an inch of water in the bottom & bring to a boil.
Cover the pan with a lid & turn to stove to low. Simmer for 35-45 minutes, or until meat on leaves are tender. Pull a leaf off occasionally to test tenderness.
Drain water out of artichoke & place on plate. Serve with garlic butter sauce OR Mix Mayonnaise and fresh lemon juice together and dip each leaf (meat end) into sauce. Starting on the outside pull leaves off and scrape teeth along leaf to remove the meat of the artichoke.


Continue doing this until you get to the very center of the artichoke (it will look like this)

You are now down to the heart of the artichoke. Using a fork or spoon, slowly scoop out all the hair until you are left with the heart (it will look like this)

The heart is the best part of the artichoke. Cut it up into bite size pieces, dip it in butteror mayonnaise sauce.
Let’s get started:
Cut the base off of the artichoke, so it will sit flat in your panCut all the points off of all the leaves with your kitchen shears
Place your artichokes in a pan with about an inch of water in the bottom & bring to a boil.
Cover the pan with a lid & turn to stove to low. Simmer for 35-45 minutes, or until meat on leaves are tender. Pull a leaf off occasionally to test tenderness.
Drain water out of artichoke & place on plate. Serve with garlic butter sauce OR Mix Mayonnaise and fresh lemon juice together and dip each leaf (meat end) into sauce. Starting on the outside pull leaves off and scrape teeth along leaf to remove the meat of the artichoke.
Continue doing this until you get to the very center of the artichoke (it will look like this)
You are now down to the heart of the artichoke. Using a fork or spoon, slowly scoop out all the hair until you are left with the heart (it will look like this)
The heart is the best part of the artichoke. Cut it up into bite size pieces, dip it in butteror mayonnaise sauce.
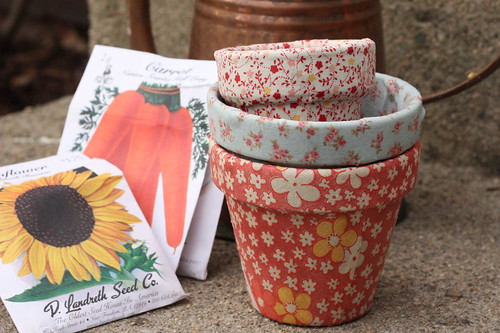
FABRIC COVERED POTS
Terra Cotta pots + fabric + mod podge = adorable!
This works better in description form, rather than step-by-step: Start by cutting a length of fabric that will wrap once around your pot. Leave extra room for folding it over on the top and bottom. Cut slits in the fabric around the top, to avoid puckering as you make your way around. Begin by coating a small section of the pot with Mod Podge. Stick the beginning of your fabric length to the pot and once it is in place, coat the fabric with Mod Podge. Continue doing this all the way around, without worrying about the top or bottom of the pot. When the outside of the pot is finished, trim your fabric so that less than an inch hangs over the top and bottom. Begin at the top, folding the fabric into the pot in pleats so that it lays nice and flat around the rim. Coat in Mod Podge. Do the same for the bottom, folding the fabric in pleats so that the bottom edge of the pot remains smooth. Coat any loose flaps of fabric with Mod Podge. Now let your pot dry.

Subscribe to:
Posts (Atom)